


Special Functions in EdgeTX are one of the powerful features that many FPV pilots overlook. While Inputs, Mixes, and Outputs tabs handle your basic stick and switch mapping, Special Functions let you assign specific actions to switches or conditions (like logical switches) — you can do things like throttle cut, voice readouts/alerts, volume control, data logging, and more. In this tutorial, I’ll explain what Special Functions are, give you an introduction on how to set them up, and show you some useful examples.

What Are Special Functions in EdgeTX?
Special Functions are actions that happen when a switch is activated, or a certain condition is met.
- Trigger: Usually a physical switch (SA, SB, SC, SH, etc.) or a Logical Switch.
- Action: Play a sound, override a channel, change volume, start logging, etc.
To access Special Functions:
- Press the MDL button to enter Model Setup.
- Keep pressing the Page button until you reach the Special Functions tab.
Note that Special functions only apply to the current model (set inside each model profile).
There’s also Global Functions that work the same way, but apply to all models on the radio. To access Global Functions:
- Press the SYS button to enter Radio Settings.
- Press the Page button a few times to the Global Functions tab.
I usually put things like volume control and backlight control in Global Functions, so you don’t need to duplicate them in every model. For model specific functions I will use Special Functions.
How to Add a Special Function
- Scroll to an empty line and press Enter.
- Select a switch on your radio.
- Choose the Function (what you want it to do).
- Set any additional parameters (value, repeat, etc.).
- Important: Tick the Enable checkbox at the bottom — many people forget this and wonder why nothing happens.
- Exit and test.
The line will usually highlight or show an icon when the function is active (e.g. when you activate the switch, or condition is met).
Useful Special Functions for FPV Drone Pilots
Play Value
Press a button and your radio speaks the current battery voltage — super useful for quick checks before flight or during long sessions.
- Switch: SH↓ (Momentary switch down)
- Function: Play Val
- Value: RxBt
- Repeat: ! (exclamation mark = play once)
- Enable: Checked
I actually wrote about this in a separate post, even goes into detail how you can turn this into a low voltage alarm using logical switch, check it out: https://oscarliang.com/edgetx-voltage-callout/

You can also play other values like:
- telemetry values such as RSSI, altitude, speed etc
- stick positions
- knob positions
- sensor values
Play Sound Track
Instead of playing value, you can play a sound track – an audio file (in WAV format) you put in the SD card.
It can be a voice announcement that says “Send It” when you arm the quad:
- Switch: Your arm switch (e.g. SD↓ for armed)
- Function: Play Track
- Value: Choose “armed.wav” (or whatever sound file you want to use)
- Repeat: – (dash = play once when switch changes)
Or voice prompts for flight modes, like “Angle mode”, “Acro mode”, and “Rescue Mode” etc, as you activate them.
For example, create a Play Track function for each switch position:
- SC up → play “Acro mode”
- SC middle → play “Angle mode”
- SC down → play “Horizon mode”

Or it could play music!
You can create custom sound tracks following this tutorial: https://oscarliang.com/taranis-play-sound-track-mp3-files/
Volume Adjustment
I have this set up in all of my radios. It lets me adjust the radio speaker volume using a knob or slider.
I usually assign Volume to a potentiometer in Global Functions, so I can turn the radio volume up or down at any time regardless of the model.
For example:
- Switch: ON (always on)
- Function: Volume
- Source: S1 (or whichever knob/slider/rotary switch you prefer)
- Enable: checked
Now, whenever you turn the S1 knob, the radio volume changes.

This is one of those features you do not realize you need until you have it.
Backlight Adjustment
This works just like Volume, but for screen brightness. Most radios have two knobs, so it’s perfect, one for volume and the other for screen brightness.
Again, I assign Backlight to a knob in Global Functions. It lets me turn the screen brightness up when flying outdoor, or down indoor.
Example:
- Trigger: ON
- Function: Backlight
- Source: S1
- Enable: checked

Reset Timer
This is useful if you want to keep track of how long you’ve been flying. Also very handy if you rely on timers for battery management and decide when to land.
I normally use my Arm switch to trigger the timer, and when I disarm, it automatically resets it.
You start the timer in the Model Setup Page under Timer 1 using your arm switch (arm position):
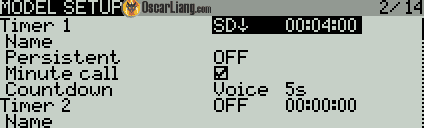
Then in Special Function you can reset Timer 1 using the arm switch (disarm position).
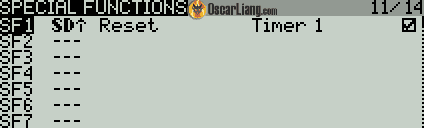
You can also set a voice shout out every minute to remind yourself how long you’ve been flying.
Override Channel
You can force a channel to a fixed value using a switch, no matter what the sticks, inputs, or mixes are doing.
A common use is Throttle Cut, where I normally use on my fixed wings that don’t have a flight controller. It acts like a arm switch for safety, by activating that switch, it overrides the throttle channel, so no matter how I move the throttle stick, throttle value is locked at zero as long as the arm switch stays deactivated.
For example:
- Trigger: switch SD down
- Function: Override
- Channel: CH1 (or whichever channel is throttle)
- Value: -100 (-100 is 0%, 0 is 50%, 100 is 100%)
- Enable box: checked
I actually have a tutorial explaining in more detail: https://oscarliang.com/setup-arm-switch-for-wing-no-fc/

Data Logging
This enables logging to the SD card, useful for reviewing flights later.
It can record:
- telemetry values like GPS coordinates and battery voltage
- stick positions
- radio states
- and other useful data
Logs are saved to the SD card and can be analysed in tools like Log Viewer.
A common setup is to make SD logging start when the quad is armed, example:
- Switch: Your arm switch (or ON for always logging)
- Function: SD Logs
- Value: 1s or 0.5s (logging interval)
- Enable: checked
I have a tutorial explaining how to set this up to log and view GPS data: https://oscarliang.com/log-telemetry/

Screenshot
This takes a screenshot of the radio screen and saves it to the SD card.
I make tutorials, so I find it to be very handy. For ordinary pilots, maybe it’s useful for sharing your radio configurations online, or want to keep a record of settings.
Pro Tips
- Enable checkbox — Double-check this every time. It’s the #1 reason Special Functions don’t work.
- Order matters — Special Functions run from top to bottom. Conflicting functions may be overridden by lower lines.
- Voice files — Make sure your sound pack is installed and files are in the correct folder (SOUNDS/en/ or your language).
- Use Logical Switches as trigger — This unlocks advanced behaviour (e.g., automatic warnings based on timer, telemetry data, or other conditions).
Final Thoughts
If you are not using Special Functions in your EdgeTX Radio, you are missing out! It turns your EdgeTX radio from a basic transmitter into a smart, helpful tool. Special Functions in EdgeTX is not the most complex part of the radio, but it is certainly one of the most useful. Once you understand the basic idea of trigger + action, the whole menu becomes much easier to understand and use.
Have you set up any particularly useful Special Functions on your radio? Share them in the comments below — I always enjoy seeing creative setups from the community.